A normalized, relational dataset makes it easier to perform feature engineering. Unfortunately, raw data for machine learning is often stored as a single table, which makes the normalization process tedious and time-consuming.
Well, I am happy to introduce you to AutoNormalize, an open-source library that automates the normalization process and integrates seamlessly with Featuretools, another open-source library for automated feature engineering. AutoNormalize detects relationships between columns in your data, then normalizes the dataset accordingly. The normalized dataset can then be returned as either an EntitySet or a collection of DataFrames.

Using AutoNormalize makes it easier to get started with Featuretools and can help provide you with a quick preview of what Featuretools is capable of. AutoNormalize also helps with table normalization, especially in situations when the normalization process is not intuitive.
A Machine Learning Demo Using AutoNormalize
Let’s take a quick look at how AutoNormalize easily integrates with Featuretools and makes automated feature engineering more accessible. To do this, we will walk through a machine learning example with a dataset of customer transactions, and we will predict, one hour in advance, whether customers will spend over $1,200 within the next hour. In this demo, we will use another open source library, Compose, to generate our labels. Below is the pandas DataFrame for our transactions.
| transaction_id | session_id | transaction_time | product_id | amount | customer_id | device | session_start | zip_code | join_date | date_of_birth | brand | |
|---|---|---|---|---|---|---|---|---|---|---|---|---|
| 0 | 9202 | 1 | 2014-01-01 00:00:00 | 36 | 81.46 | 8 | desktop | 2014-01-01 | 13244 | 2013-05-07 20:59:29 | 1973-07-28 | A |
| 1 | 5776 | 1 | 2014-01-01 00:01:05 | 36 | 107.59 | 8 | desktop | 2014-01-01 | 13244 | 2013-05-07 20:59:29 | 1973-07-28 | A |
| 2 | 1709 | 1 | 2014-01-01 00:32:30 | 36 | 57.57 | 8 | desktop | 2014-01-01 | 13244 | 2013-05-07 20:59:29 | 1973-07-28 | A |
Generating Labels
First, we are going to generate labels using Compose. For more detail, please refer to the docs here.
To begin, we create our labeling function and use Compose to create a label maker, which we use to extract labels. We transform these labels to have a threshold of $1,200, and shift cut-off times an hour earlier to predict in advance. This gives us the labels that we will use to train our model.
def total_spent(df_slice): label = df_slice["amount"].sum() return label label_maker = cp.LabelMaker(target_entity='customer_id', time_index='transaction_time', labeling_function=total_spent, window_size='1h')labels = label_maker.search(transaction_df, minimum_data='2h', num_examples_per_instance=50, gap='2min') labels = labels.threshold(1200)labels = labels.apply_lead('1h')labels.head(4)| customer_id | cutoff_time | total_spent | |
|---|---|---|---|
| label_id | |||
| 0 | 1 | 2014-01-01 05:30:50 | True |
| 1 | 1 | 2014-01-03 17:35:10 | True |
| 2 | 1 | 2014-01-03 17:37:20 | True |
| 3 | 1 | 2014-01-03 17:39:30 | True |
Using AutoNormalize to Create an EntitySet
Our next step is to create an EntitySet, which we will use to generate features. In order to take full advantage of Featuretools, we want our EntitySet to be normalized. This is where AutoNormalize comes in.
Ordinarily, we would need to go through our data, decipher the relationships between different columns, and then decide how to factor out duplicated data. Not only is this unnecessarily time-consuming, it’s also error-prone–especially in situations where we don’t understand our data thoroughly, or when columns are not intuitively named.
After deciding how to normalize, we would also need to deal with creating new DataFrames, and be sure to deduplicate the data correctly. AutoNormalize takes care of all of this, splitting DataFrames and deduplicating the data. This is particularly significant when entries are not 100% accurate, as AutoNormalize picks and chooses the dominant entries, and saves you from having to manually decide which data to retain and which data to drop.
AutoNormalize does all of this with just one simple function call. In order to normalize our DataFrame, all we need to do is call auto_entityset(df, accuracy=0.98, index=None, name=None, time_index=None), which returns a normalized EntitySet.
es = an.auto_entityset(transaction_df, accuracy=1, name="transactions", time_index='transaction_time')print(es)es.plot()Entityset: transactions Entities: transaction_id [Rows: 10000, Columns: 5] product_id [Rows: 50, Columns: 2] session_id [Rows: 200, Columns: 4] customer_id [Rows: 75, Columns: 4] Relationships: transaction_id.session_id -> session_id.session_id transaction_id.product_id -> product_id.product_id session_id.customer_id -> customer_id.customer_id
As you can see, AutoNormalize successfully split up our transaction DataFrame into separate product, session, and customer tables. We can now use this EntitySet to calculate features and train our model.
Automated Feature Engineering with Featuretools
To create features, we call dfs() on our EntitySet. Below, you can see the first twenty of the seventy-three features that were created.
feature_matrix, features_defs = ft.dfs( entityset=es, target_entity='customer_id', cutoff_time=labels, cutoff_time_in_index=True, verbose=True,)features_defs[:20][<Feature: zip_code>,<Feature: COUNT(session_id)>,<Feature: NUM_UNIQUE(session_id.device)>,<Feature: MODE(session_id.device)>,<Feature: SUM(transaction_id.amount)>,<Feature: STD(transaction_id.amount)>,<Feature: MAX(transaction_id.amount)>,<Feature: SKEW(transaction_id.amount)>,<Feature: MIN(transaction_id.amount)>,<Feature: MEAN(transaction_id.amount)>,<Feature: COUNT(transaction_id)>,<Feature: NUM_UNIQUE(transaction_id.product_id)>,<Feature: MODE(transaction_id.product_id)>,<Feature: DAY(join_date)>,<Feature: DAY(date_of_birth)>,<Feature: YEAR(join_date)>,<Feature: YEAR(date_of_birth)>,<Feature: MONTH(join_date)>,<Feature: MONTH(date_of_birth)>,<Feature: WEEKDAY(join_date)>]Training and Testing our Model
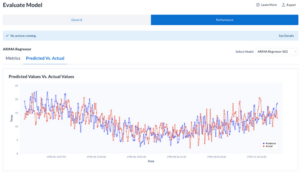
Now, we preprocess the features and split our labels and features into training and testing sets. We train a random forest classifier on the training set, then test its performance by evaluating its predictions against the training set.
y = feature_matrix.pop(labels.name)x = feature_matrix.fillna(0)x, features_enc = ft.encode_features(x, features_defs)x_train, x_test, y_train, y_test = train_test_split( x, y, train_size=.8, test_size=.2, random_state=0,)clf = RandomForestClassifier(n_estimators=10, random_state=0)clf.fit(x_train, y_train)y_hat = clf.predict(x_test)print(classification_report(y_test, y_hat)) precision recall f1-score support False 0.67 0.06 0.11 129 True 0.71 0.99 0.83 304 accuracy 0.71 433 macro avg 0.69 0.52 0.47 433weighted avg 0.70 0.71 0.61 433Below, you can see a plot depicting which features are considered important for predictions.

As you can see, many of the important features, such as STD(session_id.MAX(transaction_id.amount)), are reliant on the relational feature calculations of Featuretools. These features would not be attainable without a normalized EntitySet.
How AutoNormalize Works
The normalization process AutoNormalize takes can be split up into two main steps: discovering dependencies in the data, and breaking up the table according to these discovered dependencies. Each step can be executed individually if desired by the user
Discovering Dependencies
The first step AutoNormalize takes is finding the functional dependencies between various columns. AutoNormalize does this following the DFD algorithm. When determining dependencies, AutoNormalize has an accuracy threshold that can be set by the user. The accuracy threshold determines what percentage of the data must indicate a dependency in order for that dependency to be concluded. This process outputs a Dependencies object, which can be altered by the user if desired. To see an example of a situation where this is necessary check out this demo.
Normalizing the Dataset
The next step is normalizing the DataFrame according to the discovered dependencies. AutoNormalize normalizes from 1st normal form to 3rd normal form. When creating new tables, AutoNormalize chooses the new primary key according to this priority:
1. Least number of attributes
2. “ID” present in the name of an attribute
3. Has attribute with farthest to the left position in the original DataFrame
When the data is not 100% accurate, AutoNormalize automatically retains the dominant table entries, and drops the abnormalities. If normalizing to an EntitySet, a new index column is created when a primary key has more than one attribute. This process can output either an EntitySet or a collection of DataFrames as desired by the user.
Pipelined Together
When auto_entityset() is called, these two steps are pipelined together. However, both of these steps can be executed separately; please refer to the ReadMe for more details.
In Conclusion
AutoNormalize makes it easier to create and work with normalized EntitySets and thus create important features. Its normalization capabilities can also be applied to many other situations, as the normalized data can also be returned as a collection of pandas DataFrames.
We welcome you to give AutoNormalize a try and leave feedback on GitHub. For additional resources and installation instructions, take a look at the ReadMe and additional demos linked below.