Distributed feature engineering in Featuretools with Spark
Apache Spark is one of the most popular technologies on the big data landscape. As a framework for distributed computing, it allows users to scale to massive datasets by running computations in parallel either on a single machine or on clusters of thousands of machines. Spark can be used with Scala, R, Java, SQL, or Python code and its capabilities have led to a rapid adoption as the size of datasets — and the need for methods to work with them — increase.
After using Dask to scale automated feature engineering with Featuretools by running calculations in parallel on a single multi-core machine, we wanted to see if we could use a similar approach with Spark to scale to a cluster of multiple machines. While Dask can also be used for cluster computing, we wanted to demonstrate that Featuretools can run on multiple distributed computing frameworks. The same feature engineering code that runs in parallel using Dask requires no modification to also be distributed with Spark.

In this article, we’ll see how to use Spark with PySpark to run Featuretools on a computing cluster to scale to even larger datasets. The code for this article is available as a Jupyter Notebook on GitHub.
Data and Problem
The WSDM customer churn dataset consists of several hundred million rows of transactions, listening records, and background information for customers of a subscription music streaming service. The three tables in the dataset come in just over 30 GB total with a prediction problem of trying to determine when customers will churn.
The definition of churn can depend on the business use case and this dataset provides good practice for prediction engineering: defining the problem and then creating labels for a supervised machine learning task. This article will stick to the Spark implementation of feature engineering, but stay tuned for future articles on the process of defining and solving a prediction problem.
This article will also skip the Featuretools details, but for a guide on how Featuretools is used for automated feature engineering, check out this articleor this project comparing manual to automated feature engineering. The details of how Featuretools works are relatively straightforward, but all we need to know is that it makes hundreds of features from a relational dataset.

Distributed Approach
We can use the same approach taken with Dask to scale to a cluster with Spark: partition the data into independent subsets, and then distribute feature engineering with these subsets to multiple workers. This follows the general framework of breaking one large problem up into easier sub-problems, each of which can be run by a single worker.

Partitioning Data
To partition the data, we take the customer id represented as a string and
- Hash the id to an integer using the MD5 message-digest algorithm
- Modulo divide this integer by the number of partitions
The code is shown below:

Using the hashing function ensures that a string will always map to the same integer, so the same customer will always end up in the same partition. The assignment of customers to partition is random, but that is not an issue because each customer is independent of the others.
The end result of partitioning is that each partition holds all the data necessary to build a feature matrix for a subset of customers. Each partition is independent of all the others: we can calculate the feature matrix for one partition without worrying about the customers in any other partition. This will allow us to run the feature engineering in parallel since workers do not need to communicate with one another.
Using the id_to_hash function, we take our three individual large dataframes — representing transactions, user logs, and membership info — and convert all of the customer ids to a partition number. To actually partition the data, the most efficient approach is to use a groupby on the partition number and then iteratively save each partition. For example, in the members dataframe where the msno column is the customer id, then the following code partitions the dataframe into 1000 separate files and saves them.

Wrapping this code in a function, we can then partition all of the dataframes. If we have a large file that cannot fit into memory, such as the user_logs, then we can read and partition it in chunks using pandas pd.read_csv.

Working with a 30 GB file, this code ran in about 3 minutes. Partitioning data is a common approach when working with large datasets.
Dealing with a lot of small files is much easier than dealing with one massive file. When necessary, try to split your data into independent subsets.
Architecture Choices
All of the partitions are stored in Amazon S3 so they can be accessible to all machines in the Spark cluster. Since this implementation used Amazon EC2 instances, storing the data in Amazon’s cloud makes for efficient read and write operations. The data in S3 is persistent, meaning that it will always be accessible even when we shut down the EC2 instances. The data on the instances, in contrast, are ephemeral which means they don’t maintain state.
Storing data in S3 means that it can be accessed it from anywhere — EC2 instances or local machines— and we can shut down the EC2 instances when not in use without worrying about loss of data. Reading and writing can be done directly to S3 using nearly the same syntax as local input / output and if our servers and data are located in the same region, is fairly quick.
The distributed architecture is made up of the following parts:
- Persistent data storage through S3 with read/write in Python
- Computing cluster of EC2 instances
- Spark used to distribute work between workers
- Job execution carried out on local machine through SSH

Once all the data is partitioned and uploaded to Amazon S3, we need to launch a Spark cluster that will carry out the feature engineering. For the cluster, we choose EC2 instances because of the speed and ease of launching multiple machines. This project only used 3 instances, but the same approach could scale to thousands of machines.
Spark Cluster
Setting up a Spark cluster can be tough. I recommend following this guide to get up and running. For demonstration purposes, I used a relatively small cluster consisting of one parent node and two worker nodes. (Following the lead of Guido van Rossum and the Python community, I am using the terms parent and worker in place of the outdated master and slave.)

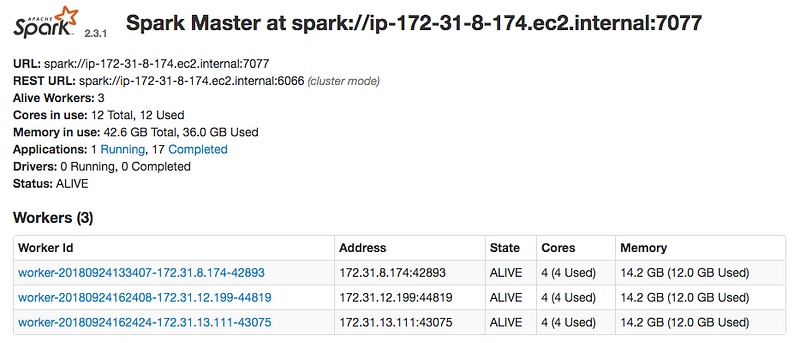
Once the instances are running, they can be connected by launching Spark from the parent and then connecting the workers. If everything goes correctly, you can monitor the cluster from localhost:8080 on the parent machine:
PySpark Implementation
Getting a cluster running is the hardest point, and from here, the code to distribute the computation across all workers is straightforward. Moreover, I was able to run all the code from a Jupyter Notebook, my preferred working environment. It’s pretty neat that a Jupyter Notebook that runs on a single machine can be used to distribute calculations across thousands of machines! (I followed this guide to work with Spark in Jupyter).
The first thing to do in the Jupyter Notebook is initialize Spark . For this we use the findspark Python library, passing in the location of the Spark installation on the parent machine.

Then, we need to create a SparkContext , the entry point to a Spark application. This sets up the internal services and creates a connection to a Spark execution environment. There are a number of parameters to pass to the SparkContext and we can also use a SparkConf object to specify a certain configuration. The below code creates both a SparkConf and a SparkContextwith parameters based on my set up:

The number of executors, 3, is set equal to the number of instances, with each executor having access to 4 cores and a maximum of 12 GB of memory. Total, we have 12 workers, each of which can carry out one feature matrix calculation for a partition at a time. The master is the IP address of your spark cluster which can be found at the local dashboard on the parent’s port 8080. These values were set based on trial and error and this guide.
Parallelized Code
The function that we want to distribute works as follows:
- Takes in a partition number and reads partition data from S3
- Creates an EntitySet with all tables and relationships
- Calculates a feature_matrix using a predefined set of features
- Saves the feature_matrix to S3 in the partition directory
The pseudo-code for the function is below:

The tasks we want to parallelize in this function are just a list of partitions:

The final step is to distribute the computation. We tell Spark to take the partitions and divide them between our workers. We then map tasks to the function by sending each partition number to partition_to_feature_matrix.
Using our SparkContext , we can do this in a single (long) line.

Monitoring Spark Jobs
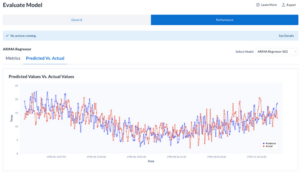
While the calculations are running, we can monitor progress both on the Spark parent dashboard at localhost:8080 and the specific job dashboard at localhost:4040. The job dashboard gives us quite a lot of information starting with a basic overview:

The stages tab shows us the directed acyclic graph, which in this case is not very complicated since all of the partitions are a single step run independently. Here we can also see more detailed information as the jobs complete such as summary statistics of the time to run each task.

(The job dashboard is only available when the computation is ongoing so wait until you’ve submitted a task before trying to pull it up.)
Next Steps
After a few hours, the computation has finished and the feature matrices — with 230 features for each customer — are stored in S3. At this point, we can join the feature matrices together for modeling, or, if we have a model that supports incremental learning, we can train on one partition at a time.

While this calculation would have been possible on a single machine given enough time, parallelizing feature engineering is an efficient method to scale to larger datasets. Furthermore, the partition and distribute framework is applicable in many different situations with significant efficiency gains.
Conclusions
Breaking one large problem up into many smaller problems is a common design pattern when working with massive datasets. Apache Spark is a powerful framework for distributed computing that lets us scale to hundreds of machines and as much data as we can get our hands on.
In this article, we saw how an automated feature engineering workflow in Featuretools could scale to a large dataset using a compute cluster managed by Spark. We were able to take the same Featuretools code that runs on a single machine and run it on multiple machines using minimal PySpark code.
Although this approach used Pandas dataframes, it’s also possible to write code in PySpark using Spark dataframes for increased efficiency in the Spark ecosystem. We’ll have more updates on this in the future, but for now, we know how to use the partition and distribute approach to efficiently parallelize feature engineering with Spark.
If building meaningful, high-performance predictive models is something you care about, then get in touch with us at Feature Labs. While this project was completed with the open-source Featuretools, the commercial product offers additional tools and support for creating machine learning solutions.
This article originally appeared on Medium.